

Creating Landscape with Neverborn Create Matrix
Summary
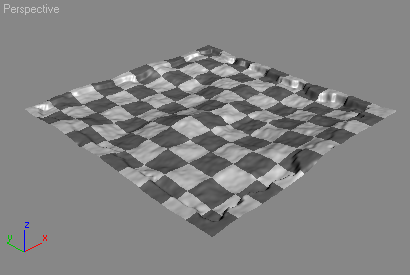
This tutorial will help you create a NeL landscape from a heightmap. A free heightmap editor is available from http://hme.sourceforge.net.
Download and Install the Create Matrix Script
- Get the script here.
- Extract the script in to your 3DSMax5\scripts directory
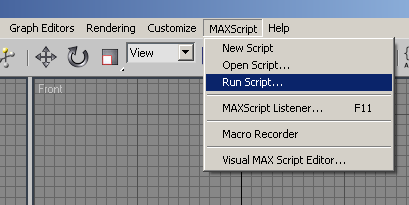
Run the 3D Studio Max script
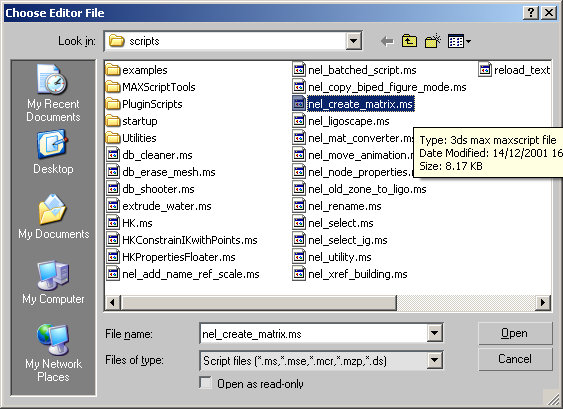
Select nel_create_matrix.ms Script
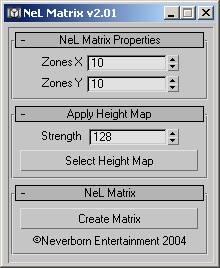
Configure Script Parameters
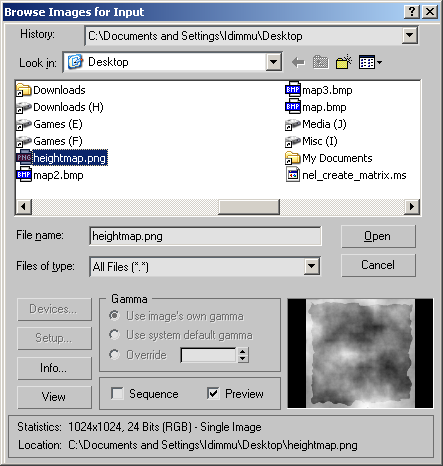
Select Heightmap
Create Matrix
Misc
An email from the old NeL mailing list
Re: [Nel] How to build landscape with 3DS max
From:     Robert Bjarnason
Subject:     Re: [Nel] How to build landscape with 3DS max
Date:     Thu, 28 Feb 2002 13:11:26 -0800

Hi Neuser,

njp> Is somebody can tell me the how to begin ? i just want to make a very little landscape  (a plane is sufficient !)

I'll give you my perspective that you can check out in addition to the above mailing-list post. (This is a more hand on approach compared to Ligo, I'm not sure my self how to use Ligo):

You have to install the plugins in Plugin_MAX: nel_export, nel_patch_converter, nel_patch_paint and tile_utility.

You need to install and compile zone_dependencies, zone_welder, zone_lighter and zone_ig_lighter. And
set up you tools/3d/build_game_data correctly (it is good to use the Cygwin tools when dealing
with the command-line interface of the build_game_data tools.  Set the build_game_data config to only
process zone and rbank if you are not processing something else.  Also you have to install the PACS
collision processing tools for the rbank process.

   1. Open an empty MAX project.
   2. Set the MAX units to Generic Units.
   3. Create a Quad-Patch with 4-5 segments
   4. Set the size of the Patch to 160x160
   5. Find out the positions the Patches need to be, positions are fixed based on the name you give the Patch. For example if you have a Patch that you decide to call 8_AN the position if that patch would be 2160x, -1200y in the Max world space.
   6. Name the patch the Zonename you decide to start with for example you could start with 8_AN at above position.
   7. Clone the Patch you just created.
   8. Set the name and position correctly by using a new zone name and corresponding absolute world position. If you set the name to 8_AO then the position will be 2320x, -1200y it seems to me that the x position changes with the letter counting in the end of the Zonename and the y position changes with the numbers in the front of the name.
   9. Now clone as many patches as you like to create a plane that is the Landscape. Make sure to use the right Patch/Zone names and their position are correct.
  10. Now you got a Plane with x many Patches.
  11. Deform the Patches as you like using the Edit Patch modifier, a standard tool in Max.  You can also use a Displacement map at this point, just use the appropriate modifier in MAX.
  12. Now you have shaped the Landscape as you want.
  13. Find the [NelConvert] modifier in the MAX menu, apply it to all the patches.
  14. Now select Tools and find the tool called Nel Tile Bank, use this tool to select the Tile Bank you have created. The Tile Banks hold all textures, transition maps, displacement maps (for making geometric noise) and info about what vegetations set is connected to tiles.
  15. Select the first Patch you want to paint and make that selected Patch fill up your Perspective View.
  16. Find and select the NeL Patch Painter and apply that modifier to the Patch.
  17. Press the Paint button in the NeL Patch Painter, Geometry roll-out.
  18. Now you can Paint you patch with the tool that pops up. The key definition is included in the src archive of the nel_patch_paint plugin.
  19. Quit the paint tool and select the next Patch to paint.
  20. Finish painting all your Patches.
  21. Run the build_game_data ./0_setup.bat.
  22. Select all your Patches/Zones and use the Export Model function in the NeL Export tool.  Save them into your build_game_data/processes/zone/zone_exported folder manually using ./3_build.bat or use build_game_data to automatically export the Patches from Max using the scripting interface, then use ./2_export.bat.
  23. Copy your shapes into processes/shapes/shapes, your .smallbank tile file into processes/smallbank/smallbank and you instance_groups into processes/ig/ig_land.
  24. Change all the config files in build_game_data to reflect the names you decided on for the patches/Zones.
  25. If you are exporting the Patches/Zones manually then use: ./3_build.bat if you are exporting the Patches/Zones automatically use ./2.export.bat.
  26. Now Landscape will be welded and lit and the final result appear in zone_lighted in the process/zone tree. And the lit instance groups will appear in process/zone/ig_land_lighted.
  27. Your collision files will be in processes/rbank/output

This was from the top of my head... It's not very complete especially tile creation and build_game_data
parts. Feel free to ask if you have specific questions.

Warm regards,
Róbert Bjarnason